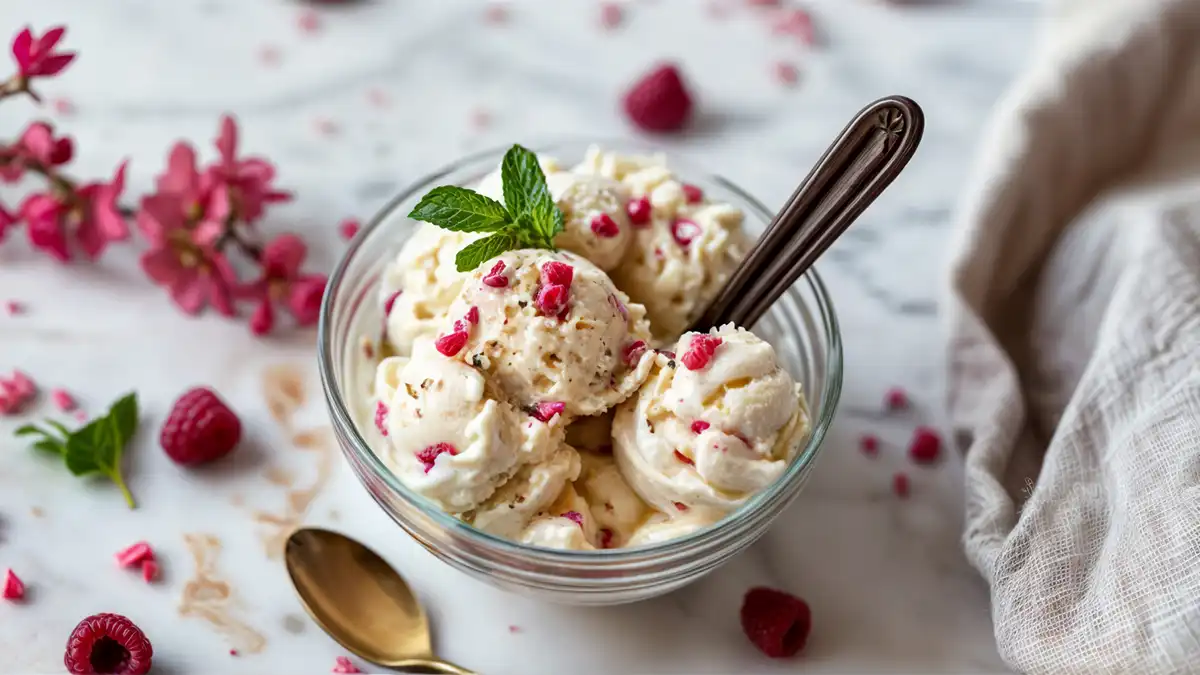
Are you ready to elevate your dessert game with a Ninja Creami vanilla ice cream recipe that promises to delight your taste buds? Imagine creamy, velvety vanilla ice cream made right in your kitchen, with the perfect blend of rich flavors and smooth texture. This recipe is not only simple but also incredibly fun to make, thanks to the innovative Ninja Creami machine. Whether you’re an ice cream aficionado or a beginner looking to impress, this guide will walk you through every step of creating the best homemade vanilla ice cream.
Table of Contents
| Section | Content |
|---|---|
| Introduction | Overview of Ninja Creami vanilla ice cream and its popularity |
| Ingredients and Equipment | Detailed list of ingredients, equipment, and variations |
| Step-by-Step Recipe Guide | Preparation, freezing, and churning process |
| Enhancing the Recipe | Flavor variations, customizing sweetness, and using different milk types |
| Serving and Storing | Serving suggestions, storage tips, and shelf life |
| FAQs | Answers to common questions about making ice cream with Ninja Creami |
| Conclusion | Summary of key points and final tips |
Why Make Ninja Creami Vanilla Ice Cream at Home?
There are numerous reasons to make your own vanilla ice cream at home:
- Quality Control: You get to choose the freshest and highest-quality ingredients.
- Customization: Adjust the sweetness, flavor, and add-ins to suit your taste.
- Health Benefits: Opt for organic, low-fat, or alternative ingredients to make a healthier dessert.
- Cost-Effective: Homemade ice cream is often cheaper than premium store-bought options.
By crafting your own ice cream, you’re not just making a treat; you’re creating an experience. Let’s dive into the world of homemade ice cream and discover why it’s a must-try!
Table: Comparison of Homemade vs. Store-Bought Ice Cream
| Criteria | Homemade Ice Cream | Store-Bought Ice Cream |
|---|---|---|
| Ingredients Quality | Fresh, customizable | Often includes preservatives |
| Flavor Options | Endless, personalized | Limited to available brands/flavors |
| Cost | Generally lower per serving | Higher, especially for premium brands |
| Nutritional Value | Can be healthier, tailored to needs | Often higher in sugar and fat |
| Additives | None, unless added by choice | Includes stabilizers and emulsifiers |
The Popularity of Vanilla Ice Cream
Vanilla ice cream has long been a favorite around the world. Its simple yet sophisticated flavor pairs well with a variety of desserts and toppings, making it a versatile choice for any occasion. The smooth and creamy texture, coupled with the rich, aromatic essence of vanilla, makes it an irresistible treat for people of all ages. Vanilla is also a perfect base for experimenting with different flavors and add-ins. From fresh fruits and nuts to chocolate chips and caramel swirls, the possibilities are endless. This adaptability is what keeps vanilla ice cream at the top of the list when it comes to homemade desserts.
Importance of Homemade Recipes
Creating ice cream at home allows for unparalleled creativity and satisfaction. You can experiment with ingredients, try new techniques, and perfect your recipe over time. Homemade ice cream is also an excellent way to engage with family and friends, turning a simple dessert into a fun and interactive activity. Moreover, with the help of the Ninja Creami machine, making ice cream has never been easier. This state-of-the-art device simplifies the process, ensuring perfect results every time. Whether you’re looking to recreate classic flavors or invent new ones, the Ninja Creami is your ultimate partner in ice cream making. Get ready to embark on a delicious journey as we explore the steps, tips, and secrets to crafting the perfect Ninja Creami vanilla ice cream.
Ingredients and Equipment
Ingredients Needed for Ninja Creami Vanilla Ice Cream Recipe
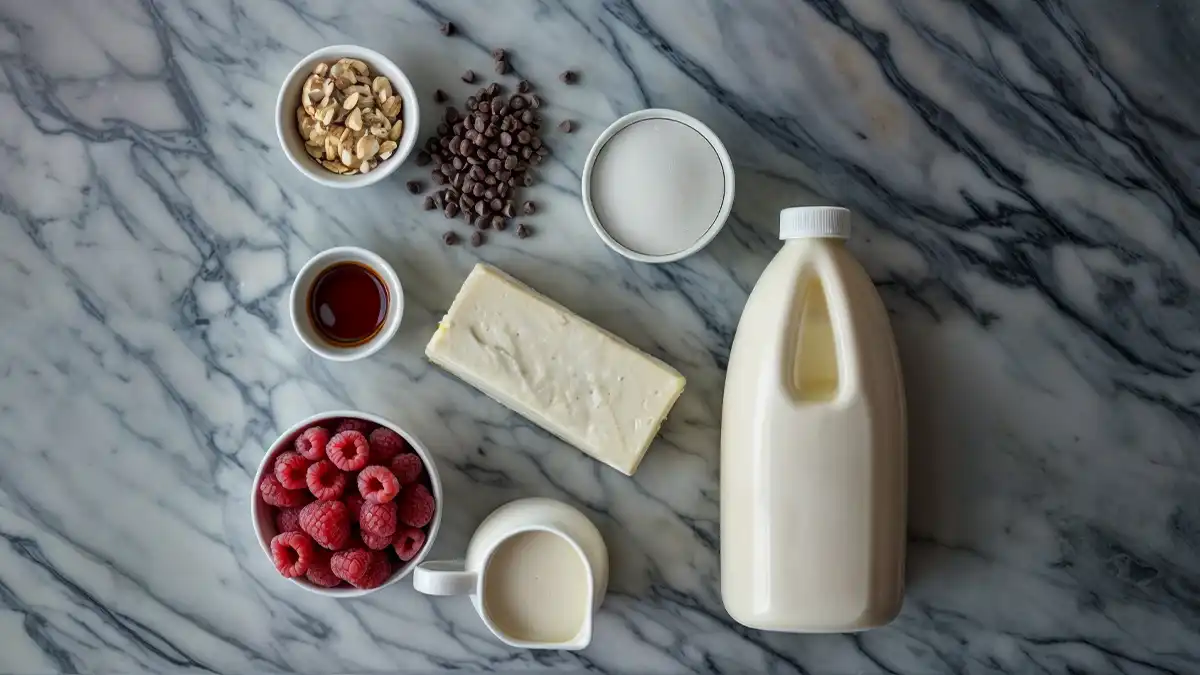
Creating the perfect Ninja Creami vanilla ice cream recipe starts with gathering the right ingredients. Here’s what you’ll need:
- 1 tablespoon (1/2 ounce) cream cheese: Adds a rich, creamy texture.
- 1/3 cup granulated sugar: Sweetens the ice cream.
- 1 teaspoon vanilla extract: Provides the classic vanilla flavor.
- 3/4 cup heavy cream: Ensures a smooth and creamy consistency.
- 1 cup whole milk: Balances the richness of the heavy cream.
Optional Add-Ins:
- Mini chocolate chips: For a delightful crunch.
- Fresh fruit pieces: For a refreshing twist.
- Nuts: Adds a crunchy texture.
Using high-quality, fresh ingredients will ensure the best results for your homemade ice cream. You can also customize your recipe by choosing organic or low-fat alternatives based on your dietary preferences.
Essential Equipment for Making Vanilla Ice Cream
Having the right tools makes the ice cream-making process much smoother and more enjoyable. Here’s a list of essential equipment you’ll need:
- Ninja Creami machine: The key to achieving that perfect creamy texture.
- Measuring cups and spoons: For accurate ingredient measurements.
- Mixing bowls: To mix your ingredients thoroughly.
- Spatula: To scrape the sides of the bowl.
- Handheld frother: Optional, but useful for blending the mixture smoothly.
Table: Equipment Checklist
| Equipment | Purpose |
|---|---|
| Ninja Creami machine | Churns and freezes the ice cream |
| Measuring cups and spoons | Ensures precise measurement of ingredients |
| Mixing bowls | For mixing and combining ingredients |
| Spatula | Scrapes the sides of the bowl for thorough mixing |
| Handheld frother | Optional – blends the mixture smoothly |
Variations and Substitutes
One of the great things about making your own ice cream is the ability to customize it to your liking. Here are some variations and substitutes you can try:
- Dairy-Free Option: Use coconut milk or almond milk instead of whole milk and heavy cream.
- Low-Sugar Version: Substitute granulated sugar with a low-calorie sweetener like stevia or erythritol.
- Protein Boost: Add a scoop of vanilla protein powder to the mixture.
For a delicious dessert pairing, consider trying this Italian Hangover Cake which complements the creamy vanilla ice cream perfectly.
Importance of High-Quality Ingredients
Using high-quality ingredients is crucial when making homemade ice cream. Fresh cream and milk will give your ice cream a superior taste and texture. Additionally, using real vanilla extract rather than artificial flavoring can make a significant difference in flavor.
Tips for Measuring Ingredients Accurately
- Use dry measuring cups for dry ingredients: Ensure you level off the excess with a straight edge.
- Use liquid measuring cups for wet ingredients: Check the measurement at eye level for accuracy.
- Weigh ingredients if possible: This can provide the most precise measurements, especially for baking.
With these ingredients and equipment, you are well on your way to creating the most delightful Ninja Creami vanilla ice cream. Next, we’ll dive into the step-by-step process to make this delicious treat.
Step-by-Step Recipe Guide
Preparing the Ingredients for Ninja Creami Vanilla Ice Cream
Creating the perfect Ninja Creami vanilla ice cream begins with proper preparation. Here are the steps to ensure your ingredients are ready:
- Prepare the Cream Cheese:
- Soften 1 tablespoon (1/2 ounce) of cream cheese by microwaving it for about 10-15 seconds. This makes it easier to blend with other ingredients.
- Measure and Mix Ingredients:
- In a medium-sized mixing bowl, combine:
- 1/3 cup granulated sugar
- 1 teaspoon vanilla extract
- Stir until the sugar dissolves into the vanilla extract.
- In a medium-sized mixing bowl, combine:
- Add Dairy Components:
- Gradually whisk in:
- 3/4 cup heavy cream
- 1 cup whole milk
- Ensure the mixture is well combined and smooth.
- Gradually whisk in:
Freezing the Ice Cream Mixture
Once your mixture is ready, it’s time to freeze it. Proper freezing is crucial for achieving the right texture.
- Pour the Mixture into the Ninja Creami Pint Container:
- Carefully pour the prepared ice cream base into the Ninja Creami pint container, ensuring it doesn’t exceed the fill line.
- Freeze the Mixture:
- Place the pint container in the freezer and let it freeze for at least 24 hours. This allows the mixture to set properly before churning.
- Optimal Freezing Tips:
- Ensure your freezer is set to the coldest setting.
- Place the container on a flat surface to freeze evenly.
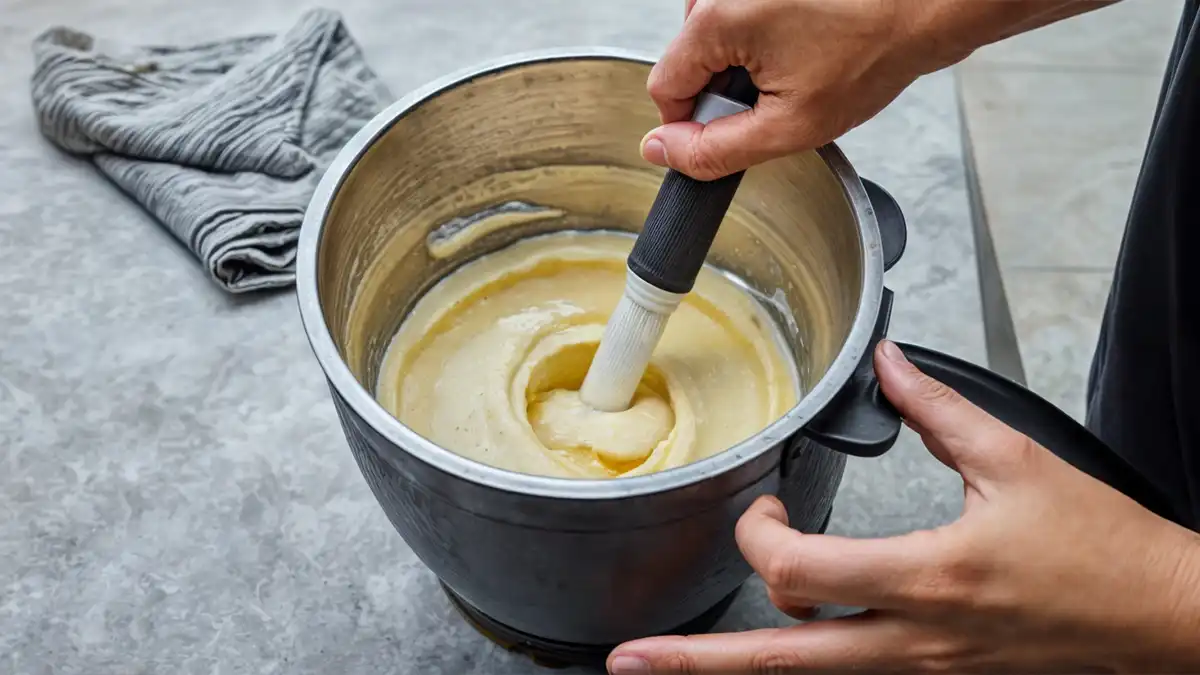
Churning the Ice Cream with Ninja Creami
Now that your mixture is frozen, it’s time to churn it into creamy, delicious ice cream.
- Prepare the Ninja Creami Machine:
- Attach the pint container to the Ninja Creami machine according to the manufacturer’s instructions.
- Churning Process:
- Select the “Ice Cream” function on your Ninja Creami machine.
- Let the machine churn the frozen mixture. This usually takes about 2-3 minutes.
- If desired, you can run the cycle twice for an even creamier texture.
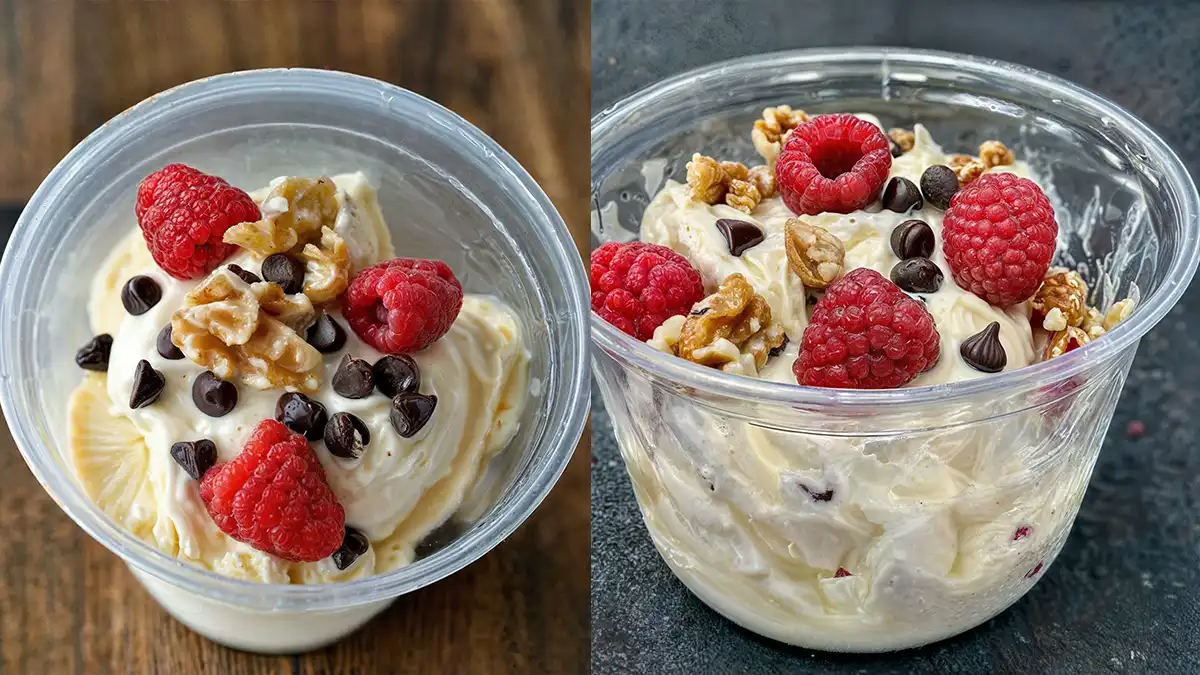
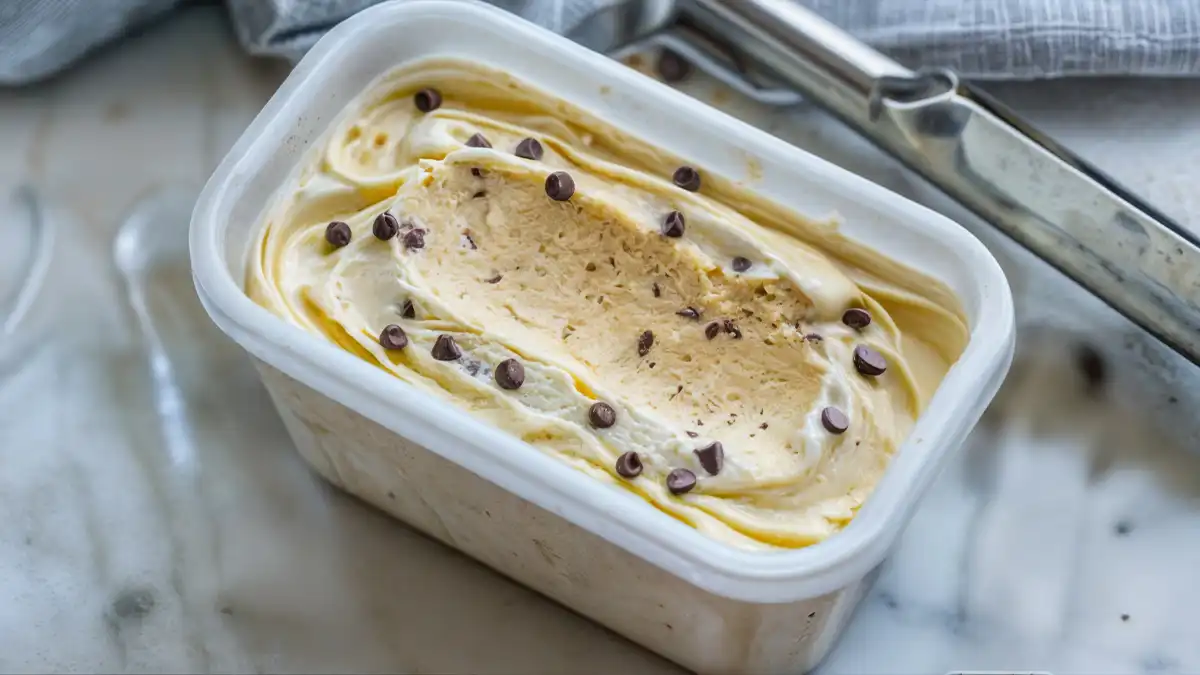
- Adding Mix-Ins (Optional):
- Once the initial churning is complete, you can add your favorite mix-ins such as mini chocolate chips or fruit pieces.
- Use the “Mix-In” function on the Ninja Creami to blend these additions into the ice cream.
Common Issues and Troubleshooting
Even with the best preparation, sometimes things don’t go as planned. Here are some common issues and how to fix them:
- Ice Cream is Too Hard:
- Let the pint sit at room temperature for a few minutes before serving.
- Ice Cream is Too Soft:
- Ensure the mixture was frozen for a full 24 hours before churning.
- Ice Cream is Grainy:
- Make sure the sugar is fully dissolved before freezing the mixture.
Tutorial Video
For a visual guide on making Ninja Creami vanilla ice cream, check out this helpful tutorial video:
Pairing Your Ice Cream
To make your dessert experience even more delightful, consider pairing your homemade ice cream with a delicious treat like Boursin Cheese Pasta. The creamy pasta complements the rich vanilla ice cream perfectly. For more information on ice cream science and techniques, visit Ice Cream Science. This site offers a wealth of knowledge on making the best homemade ice cream.
By following these steps, you’ll be able to create a delicious Ninja Creami vanilla ice cream that is sure to impress. Next, we’ll explore how to enhance your recipe with various flavors and add-ins.
Enhancing the Ninja Creami Vanilla Ice Cream Recipe
Flavor Variations for Your Vanilla Ice Cream
One of the best aspects of making your own Ninja Creami vanilla ice cream is the ability to experiment with different flavors and add-ins. Here are some exciting variations you can try:
- Adding Mix-Ins:
- Chocolate Chips: Stir in 1/4 cup of mini chocolate chips after the initial churning.
- Fresh Fruit: Add chopped strawberries, blueberries, or raspberries for a fruity twist.
- Nuts: Mix in chopped nuts like almonds, pecans, or walnuts for extra crunch.
- Flavor Enhancements:
- Caramel Swirls: Gently fold in caramel sauce to create a ribbon effect.
- Mint Extract: Add a few drops of mint extract for a refreshing mint vanilla ice cream.
- Cinnamon: Sprinkle in ground cinnamon to give your ice cream a warm, spicy flavor.
Customizing Sweetness Levels
Adjusting the sweetness of your ice cream is easy and allows you to tailor it to your taste preferences.
- Reducing Sugar:
- Replace some or all of the granulated sugar with a sugar substitute like stevia or monk fruit sweetener.
- Increasing Sweetness:
- Add an extra tablespoon of sugar or a bit of honey to the mixture before freezing.
Using Different Types of Milk and Cream
Different types of milk and cream can change the texture and flavor of your Ninja Creami vanilla ice cream. Here are some alternatives you might consider:
- Dairy-Free Options:
- Coconut Milk: Provides a rich, tropical flavor.
- Almond Milk: A lighter option that works well in ice cream.
- Oat Milk: Gives a creamy texture with a hint of oat flavor.
- Low-Fat Options:
- Use low-fat milk or half-and-half instead of whole milk and heavy cream for a lighter version of the ice cream.
Table: Milk and Cream Alternatives
| Type | Flavor Profile | Texture |
|---|---|---|
| Coconut Milk | Rich, tropical | Creamy |
| Almond Milk | Light, nutty | Slightly thin |
| Oat Milk | Mild, slightly sweet | Creamy |
| Low-Fat Milk | Mild, less rich | Light |
| Half-and-Half | Mild, slightly creamy | Creamy but lighter than cream |
Protein-Enhanced Vanilla Ice Cream
Adding protein to your ice cream can turn it into a more nutritious treat, perfect for a post-workout snack or a healthy dessert option.
- Adding Protein Powder:
- Mix in 1 scoop of vanilla protein powder with the other ingredients before freezing. This not only boosts the protein content but also maintains the delicious vanilla flavor.
- Health Benefits:
- Incorporating protein helps in muscle recovery and keeps you fuller for longer.
- It’s a great way to enjoy a treat without compromising on nutrition.
For more ideas on how to enhance your culinary creations, check out this delightful Raspberry Chipotle Sauce recipe. It pairs wonderfully with vanilla ice cream, adding a sweet and spicy kick.
Tips for Experimenting with New Flavors
- Start Small: When trying a new flavor, make a small batch first to see if you like it.
- Balance Flavors: Ensure that new ingredients complement the vanilla base without overpowering it.
- Keep It Simple: Sometimes, less is more. A few well-chosen add-ins can make a big difference.
Enhancing your Ninja Creami vanilla ice cream with various flavors and ingredients can be a fun and rewarding experience. Next, we’ll explore the best ways to serve and store your homemade ice cream.
Serving and Storing Ninja Creami Vanilla Ice Cream
Best Ways to Serve Ninja Creami Vanilla Ice Cream
Serving your homemade Ninja Creami vanilla ice cream can be as exciting as making it. Here are some delightful serving suggestions:
- Classic Cone or Bowl:
- Scoop your vanilla ice cream into a cone or bowl for a simple yet satisfying treat.
- Toppings Galore:
- Chocolate Syrup: Drizzle over your ice cream for a rich chocolatey taste.
- Sprinkles: Add colorful sprinkles for a fun and festive look.
- Fresh Fruit: Top with sliced strawberries, blueberries, or bananas for a fresh and healthy addition.
- Creative Desserts:
- Ice Cream Sandwiches: Place a scoop of ice cream between two cookies.
- Milkshakes: Blend your vanilla ice cream with milk to create a delicious milkshake.
- Affogato: Pour a shot of hot espresso over a scoop of ice cream for a delightful contrast of temperatures and flavors.
Table: Ice Cream Serving Ideas
| Serving Style | Description |
|---|---|
| Classic Cone or Bowl | Simple and traditional |
| Chocolate Syrup | Rich and indulgent |
| Sprinkles | Fun and colorful |
| Fresh Fruit | Healthy and refreshing |
| Ice Cream Sandwiches | Creative and portable |
| Milkshakes | Smooth and creamy beverage |
| Affogato | Unique and sophisticated |
For a unique twist, you can also try pairing your vanilla ice cream with this Crab Brulee Recipe for a delightful combination of sweet and savory flavors.
Storing Your Homemade Vanilla Ice Cream
Proper storage is essential to maintain the freshness and texture of your Ninja Creami vanilla ice cream. Here are some tips to ensure your ice cream stays delicious:
- Using the Right Containers:
- Store your ice cream in an airtight container to prevent ice crystals from forming.
- Consider using silicone or plastic containers with tight-fitting lids.
- Freezer Temperature:
- Keep your freezer set at the coldest setting to ensure the ice cream remains solid.
- Place the container at the back of the freezer where the temperature is most consistent.
- Avoiding Freezer Burn:
- Place a piece of plastic wrap directly on the surface of the ice cream before sealing the container. This reduces the formation of ice crystals and keeps the ice cream creamy.
Table: Storage Tips for Homemade Ice Cream
| Storage Method | Description |
|---|---|
| Airtight Container | Prevents ice crystals and maintains freshness |
| Coldest Freezer Setting | Ensures the ice cream stays solid |
| Plastic Wrap on Surface | Reduces ice crystal formation and prevents freezer burn |
Shelf Life of Homemade Ice Cream
- Freshness: Homemade ice cream is best enjoyed within 1-2 weeks for optimal flavor and texture.
- Longer Storage: If you need to store it longer, ensure it remains in an airtight container and avoid frequent temperature changes.
Creative Presentation Ideas
Making your ice cream look as good as it tastes can enhance the enjoyment. Here are some presentation tips:
- Decorative Bowls:
- Serve in colorful or themed bowls to match the occasion.
- Edible Bowls:
- Use waffle bowls or chocolate cups for an extra treat.
- Garnishes:
- Add a mint leaf, a sprinkle of cocoa powder, or a cinnamon stick for a sophisticated touch.
By following these serving and storage tips, you can ensure that your Ninja Creami vanilla ice cream is always ready to impress. Whether you’re enjoying it on its own or pairing it with a delightful dish, homemade ice cream is a versatile and delicious treat. Next, we’ll address some frequently asked questions to help you troubleshoot and perfect your ice cream making process.
FAQs
How to Make Ice Cream with Ninja Creami?
Making ice cream with the Ninja Creami is straightforward and fun. First, prepare your ingredients by mixing cream cheese, sugar, vanilla extract, heavy cream, and whole milk. Pour this mixture into the Ninja Creami pint container and freeze for 24 hours. Once frozen, attach the container to the Ninja Creami machine and select the “Ice Cream” function. In a few minutes, you’ll have smooth and creamy ice cream ready to enjoy!
Do You Really Need to Freeze Ninja Creami for 24 Hours?
Yes, it is essential to freeze the mixture for at least 24 hours. This ensures that the mixture is solid enough for the Ninja Creami to churn it into creamy ice cream. If not frozen long enough, the ice cream might turn out too soft or slushy.
Why Is My Ninja Creami Not Creamy?
If your Ninja Creami vanilla ice cream is not creamy, it could be due to a few reasons:
- The mixture wasn’t frozen for a full 24 hours.
- The ingredients weren’t blended thoroughly before freezing.
- The mixture contains too much water or low-fat ingredients, which can affect texture.
Ensure you follow the recipe closely and use the right proportions of ingredients for the best results.
Can You Make Ice Cream with a Regular Ninja?
While a regular Ninja blender can blend ingredients, it doesn’t have the same freezing and churning capabilities as the Ninja Creami. To achieve the smooth, creamy texture of ice cream, you need a machine specifically designed for that purpose, like the Ninja Creami.
How Long Does It Take to Make Ninja Creami Vanilla Ice Cream Recipe?
The entire process takes about 24 hours and a few minutes:
- Preparation: 10-15 minutes to mix ingredients.
- Freezing: At least 24 hours to freeze the mixture.
- Churning: 2-3 minutes in the Ninja Creami machine.
So, plan ahead to ensure your ice cream is ready when you need it.
Can I Make This Recipe Without a Ninja Creami Machine?
Yes, you can make this recipe without a Ninja Creami machine, but the texture may not be as smooth. Use a standard ice cream maker, following its instructions for freezing and churning. Alternatively, you can use a blender to mix the ingredients and then freeze, stirring every few hours to break up ice crystals.
What Are the Best Containers for Storing Ice Cream?
The best containers for storing ice cream are airtight containers made of plastic or silicone. These materials help prevent ice crystals and freezer burn. For extra protection, place a piece of plastic wrap directly on the surface of the ice cream before sealing the lid. This keeps your ice cream fresh and creamy for longer.
By addressing these frequently asked questions, we hope to make your Ninja Creami vanilla ice cream experience as smooth and enjoyable as possible. Whether you’re troubleshooting or looking for tips, these answers should help guide you to perfect homemade ice cream every time.
Next, we’ll conclude with a summary of the key points and final tips for making the best Ninja Creami vanilla ice cream.
Conclusion
Final Thoughts on Making Ninja Creami Vanilla Ice Cream
Creating your own Ninja Creami vanilla ice cream at home is a rewarding and fun experience. With the right ingredients, equipment, and a bit of patience, you can enjoy rich, creamy ice cream that rivals any store-bought version. Here are some key points to remember:
- Use Quality Ingredients: Fresh, high-quality ingredients make a big difference in the taste and texture of your ice cream.
- Freeze Properly: Make sure to freeze your mixture for a full 24 hours to achieve the best results.
- Experiment with Flavors: Don’t be afraid to get creative. Try different mix-ins, flavors, and variations to find your perfect ice cream.
- Store Correctly: Use airtight containers and follow proper storage tips to keep your ice cream fresh and creamy.
Encouragement to Try the Recipe
Making homemade ice cream with the Ninja Creami is not only fun but also allows you to control what goes into your dessert. Whether you’re catering to dietary needs, experimenting with new flavors, or simply enjoying the process of making ice cream from scratch, this recipe is a great place to start.
For those who love to experiment, why not try pairing your vanilla ice cream with unique and delicious dishes like Porcupine Meatballs with Mushroom Soup? The savory meatballs and creamy soup create an interesting contrast that makes dessert time even more exciting.
Final Tips for Perfect Ninja Creami Vanilla Ice Cream Recipe
- Consistency is Key: Ensure that your mixture is well-blended before freezing.
- Proper Churning: Follow the Ninja Creami instructions closely to churn the ice cream to the perfect consistency.
- Enjoy the Process: Making ice cream is an enjoyable activity. Involve family or friends and make it a fun experience.
By following this guide, you’ll be able to create delicious Ninja Creami vanilla ice cream recipe that you can enjoy any time. So, gather your ingredients, prep your Ninja Creami, and get ready to indulge in some of the best homemade ice cream you’ve ever tasted. Happy ice cream making!